Workshops and warehouses are full of “routine” lifts that don’t feel high-risk—especially when using a rope hoist—until something goes wrong. A gearbox gets lifted onto a bench. A pump gets moved to a mezzanine. A pallet gets tilted to slip a sling under it. People are nearby, forklifts are moving, aisles are narrow, and the pressure is on to keep production flowing.
Most lifting failures in these environments don’t happen mysteriously. They follow patterns. The same few causes keep showing up: unclear loads, rushed rigging choices, poor load control, skipped checks, and worn or mismatched gear.
This guide breaks down the common failures you’ll see in Sydney workshops and warehouses, what the early warning signs look like, and prevention steps you can actually apply on the floor—without turning your workplace into a paperwork factory.
What “lifting failure” really means in a workshop or warehouse
In everyday sites, “failure” doesn’t always mean a dramatic break. It often starts as a loss of control or a near miss:
• A load swings into a racking upright
• A hook twists under a side pull
• A sling slips because the centre of gravity isn’t where you thought
• A lift stalls because the weight was guessed, not known
• A component binds or rides up because the load path wasn’t straight
• Someone steps into the pinch zone to “guide it a bit”
Prevention is about building a system that stops small problems from becoming serious incidents.
Quick answer: the big four causes
The most common causes of lifting failures in workshops and warehouses are:
• Overload and shock loading
• Incorrect rigging (angles, attachment points, sharp edges, imbalance)
• Poor load control (swing loads, side pulls, people too close)
• Skipped inspections and worn components (hooks, slings, chains, ropes, latches, controls)
Failure 1: Overload and “unknown weight” lifts
What it looks like
Overload is often invisible—until it’s not. In workshops, the weight is frequently assumed (“It’s only a motor”), or the load has hidden variables (fluids, attachments, corrosion, packed product). In warehouses, mixed pallets and rework stock can be heavier than expected.
Early warning signs include:
• The lift feels sluggish or stalls
• The load doesn’t come up evenly
• Unusual sounds from the lifting mechanism
• The load “pops” upward after tension builds (a sign of binding or snagging)
• Excessive deflection in beams or supporting structures (if used)
Why does it happen in warehouses and workshops
• No verified weight (no nameplate, no drawings, no scale)
• People rely on experience instead of data
• Loads are picked from awkward positions (under benches, inside cages, on pallets)
• Add-ons are forgotten (slings, spreader bars, lifting frames, clamps)
How to prevent it
• Treat “unknown weight” as a stop-work condition until verified.
• Build a simple habit: if it’s not clearly marked, don’t guess—confirm.
• Keep a quick reference list for common items (motors, gearboxes, coils, dies) with typical weights, and update it when you learn something new.
• Plan the lift path so the load can be set down immediately if anything feels wrong—no “just get it up a bit more
Where overload risk keeps showing up, standardising the right lifting and hoisting equipment for your typical loads can remove guesswork and reduce strain on gear.
Q&A on overload
How do we handle a lift when the weight is unknown but the job needs to be moved?
Use a verification step before the lift: check drawings, nameplates, supplier data, or weigh the item if practical. If it still can’t be verified, treat it as high-risk and escalate to a competent person to assess the lift method.
Failure 2: Shock loading (the silent gear killer)
Shock loading is when a load is applied suddenly: snatching a slack line tight, a load dropping a few millimetres, then catching, or a load jerking because it snagged, then released.
What it looks like
• A sudden “bang” as tension comes on
• A brief load drop, then catch
• Equipment that was “fine yesterday” now shows deformation or unusual wear
• Slings or attachments show glazing, cuts, or stretched fibres
Why it happens
• Taking up slack too quickly
• Lifting from a snagged position (wedged against a pallet, jammed under a bench)
• Dragging then lifting (side pull turns into a shock as it frees)
• Poor communication between operator and spotter
How to prevent it
• Take up tension slowly and watch the load before committing to the lift.
• Remove snags first: if it’s stuck, don’t “power through”. Reset the load.
• Keep the load path vertical and clean—no rubbing or dragging that can release unpredictably.
• Use a spotter with authority to call “stop” the moment the load behaves unexpectedly.
A practical stop-work trigger
If the load jerks, snatches, or drops and catches, stop the lift, lower to a safe position, and inspect the rigging and attachment points before continuing.
Failure 3: Side loading and off-axis pulls
Side loading is common in tight aisles, between machines, and around racking where a straight lift feels inconvenient.
What it looks like
• Hooks twisting or sitting at odd angles
• The load is creeping sideways while lifting
• Attachments rotating unexpectedly
• Excessive wear on one side of a component
Why it happens
• The load is not under the hook or lifting point
• The operator is trying to “drag then lift”
• The pick point is offset because access is limited
How to prevent it
• Move the lifting point to align vertically over the centre of the lift before you take the load.
• If you can’t align, change the method: reposition the load, adjust the anchor point, or use appropriate rigging that maintains straight-line loading.
• Don’t use the lifting system as a towing device.
Q&A on side loading
Is a small sideways pull ever acceptable?
Even small side pulls can create large unintended forces and cause twist, damage, and loss of control—especially if the load frees suddenly. The safer rule is: if it isn’t vertical and controlled, redesign the setup.
Failure 4: Rigging mistakes (angles, centre of gravity, and “it’ll be right” attachment points)
Workshops and warehouses are full of irregular loads: odd shapes, offset centres of gravity, and mixed attachment points.
Common rigging failures you’ll see
• Sling angles are too wide, increasing tension dramatically
• One sling is taking most of the load due to uneven leg lengths
• Sling slipping off because there’s no positive restraint
• Using an attachment point not designed for lifting
• Cutting or crushing slings on sharp edges
• Lifting from a pallet in a way that destabilises it
Early warning signs
• The load tilts as tension comes on
• The load rotates as it leaves the ground
• Slings “walk” toward edges
• A sling leg goes slack while another tightens
• You can’t predict where the load will settle
Prevention that works on busy floors
• Do a “tension check” first: take the slack out and watch what happens before lifting clear.
• Identify the centre of gravity (CoG) and plan for it—especially with motors, pumps, gearboxes, and fabricated frames.
• Use edge protection when slings pass over corners.
• Choose attachment points designed for lifting, not “whatever hole is there”.
• Pause and involve a competent person if the lift is complex or the consequences are high.
Failure 5: Worn hooks, missing latches, and deformed components
In workshop settings, lifting gear gets borrowed, swapped, and returned. In warehouses, it can live on a hook by the door, exposed to knocks and corrosion. Over time, small damage becomes a failure path.
What it looks like
• Hooks with visible opening, twist, or tip damage
• Latches missing, bent, or not closing
• Uneven wear in hooks and attachment points
• Pins or shackles that don’t seat properly
• Hardware with unreadable markings
Why it happens
• Gear is used outside its intended purpose (dragging, prying, side pulls)
• No clear inspection ownership (“everyone uses it, no one checks it”)
• Gear is stored poorly and knocked around by forklifts and pallets
• Coastal and humid air accelerates corrosion in parts of Sydney
How to prevent it
• Assign ownership: every shift needs someone accountable for pre-start checks.
• Tag out immediately if a latch is missing, a hook looks deformed, or markings can’t be read.
• Store lifting gear in dedicated racks or cages—not on the floor or on machine handles.
• Build a basic register: what it is, where it lives, last inspection date, and any findings.
Failure 6: Uncontrolled swing loads and “guiding by hand”
Swing loads are one of the most common causes of injuries and damage in warehouses. The lift itself might be fine—the failure is control.
What it looks like
• The load swings into racking, benches, or machines
• A worker steps in to “steady” it and gets pinched
• The load rotates and catches a corner or pallet
Why it happens
• Fast lifting and stopping
• Air movement (open roller doors, fans)
• Load is picked from a point that encourages rotation
• People are too close, and there’s no clear exclusion zone
How to prevent it
• Slow is smooth: lift and travel movements should be deliberate, not sharp.
• Use tag lines where appropriate to control rotation and keep hands away from pinch zones.
• Establish an exclusion zone around the load path—especially in shared forklift/pedestrian areas.
• Choose a lift route that avoids traffic, doors, and tight corners.
Q&A on swing loads
Should someone ever put their hands on a suspended load to stop it from swinging?
Hands and suspended loads don’t mix. Use controlled movements, tag lines where suitable, and set down and reset if the load starts behaving unpredictably.
Failure 7: Poor communication and unclear roles
In workshops and warehouses, lifting is often “extra” work layered onto a busy day. That’s when roles get fuzzy.
What it looks like
• Two people give instructions at once
• The operator can’t see the load, and the spotter isn’t decisive
• People enter the lift zone because “they didn’t know it was happening”
• A lift continues despite uncertainty
Prevention: a simple communication standard
• One designated leader for the lift (even for small lifts).
• One spotter if visibility is limited.
• A clear stop command that anyone can use.
• Confirm: load weight (or plan), attachment points, travel path, and set-down area.
Failure 8: Skipped inspections and “we’ll check it later”
Most workplaces have inspection requirements, but the failure comes from inconsistencies: checks happen when time allows, not when risk requires.
A practical inspection rhythm for workshops/warehouses
Pre-start (daily / each use)
• Obvious damage, deformation, and missing parts
• Markings readable (capacity/ID where applicable)
• Hooks and latches functioning
• Slings/chains/attachments free of cuts, kinks, corrosion, heat damage
• Controls working smoothly and predictably
Weekly (or scheduled per usage intensity)
• More detailed check by an assigned person
• Storage condition check (are items getting damaged between uses?)
• Verify tagging/ID and that suspect gear is removed
Periodic (per your system and risk profile)
• Inspection by a competent person and proper records
For a recognised AU reference on managing plant risks (including inspection and maintenance expectations), align your system with the guidance in the SafeWork NSW Code of Practice: Managing the risks of plant in the workplace.
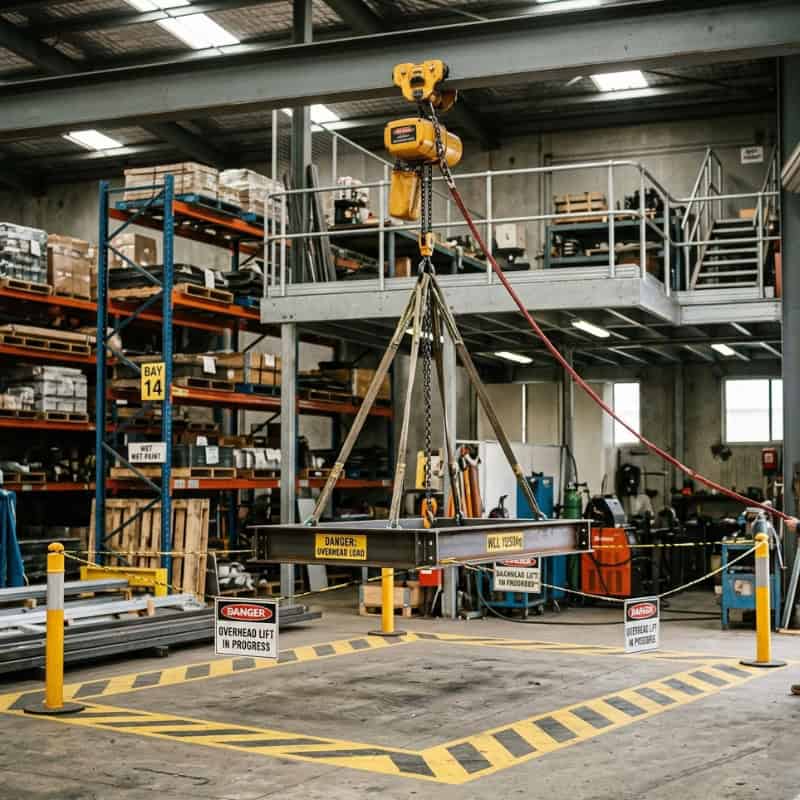
Special scenario: moving materials up levels safely (mezzanines, platforms, and multi-level stores)
Multi-level warehouses and workshops are common across Sydney, and “up a level” moves add unique risk: drop zones, edge protection, people below, and changing load stability.
Common failure patterns in multi-level moves
• Lifting past edges where the load can strike a guardrail or upright
• People working below the lift path
• Loads snagging on platform lips
• Poor set-down planning (nowhere to safely land)
Prevention checklist for level changes
• Define a no-go zone below the lift path (not just “keep clear”).
• Confirm the set-down area is clear and can handle the load safely.
• Use a controlled lift route with minimal obstacles.
• Plan how the load will be received—no leaning over edges to grab it.
• If the move is frequent, consider a dedicated method and standard work instruction rather than reinventing the setup each time.
If your site regularly handles these moves, it can be worth reviewing your approach to moving materials up levels safely in the context of your typical loads, access constraints, and traffic flow.
Building a “failure-resistant” lifting routine (without overcomplicating it)
If you want fewer incidents, less damage, and less downtime, focus on four repeatable habits:
1) Verify before you lift
• Weight known or verified
• Attachment points selected intentionally
• Path and set-down area clear
2) Control the first 50 mm
Most problems show up as you take tension and lift slightly.
• Take slack out slowly
• Watch for tilt, rotation, slip, and snagging
• If anything looks off, set down and reset
3) Keep people out of the danger zone
• Establish exclusion zones
• Use tag lines and controlled movements
• No hands-on suspended loads
4) Inspect as you mean it
• Daily checks for obvious defects
• Clear tag-out process
• Periodic checks that match usage intensity
If you’re reviewing your lifting setup and want to understand what equipment characteristics matter in workshop/warehouse environments, start with lifting equipment for workshops and warehouses and build a consistent approach around your most common lifts.
Practical “stop the lift” triggers your team can memorise
Make these non-negotiable. If any occur:
• The load behaviour is unexpected (tilt, rotation, snag, jerk)
• The weight is uncertain or clearly higher than expected
• Any rigging component looks damaged, deformed, or unmarked
• The operator or spotter loses visibility or control
• Someone enters the exclusion zone
• You hear unusual sounds or feel abnormal vibration/roughness in operation
Stop, set down if safe, isolate where required, and escalate.
FAQs
What’s the single most common cause of lifting incidents in warehouses?
Loads swing, rotate, or shift uncontrollably when workers rush or fail to plan the pick point, rigging, or movement.This often combines with people standing too close to “guide it”.
How often should lifting gear be checked in a workshop?
At a minimum, perform a pre-start check each use and schedule inspections based on how frequently and harshly you use it. High-use gear in busy workshops usually needs more frequent formal checks than rarely used items.
What’s the safest way to deal with a snagged load?
Don’t power through. Lower, remove tension, fix the snag, and reset the lift so the load path is clean and vertical. Snagging is a common trigger for shock loading.
Are missing tags or unreadable markings a big deal?
Yes. If you can’t confirm what the gear is rated for or identify it properly, it shouldn’t be used. Treat missing/illegible markings as a remove-from-service condition until confirmed.
How do we prevent people from stepping into the pinch zone?
Use exclusion zones and give the spotter authority to stop the lift. Use tag lines where suitable and control movement speed so the load doesn’t “run away” from the team.
What should we do differently when moving loads to mezzanines or upper levels?
Plan the drop zone and set-down area first, keep people out from below, and avoid receiving loads by hand at edges. Multi-level moves are where routine habits break down—so tighten the process.