

A rubbish chute can be mounted three ways: on a scaffold bracket, on a window or parapet clamp over a solid masonry wall, or on a counterweighted frame sitting on a flat roof or slab. Whichever you choose, every anchorage must withstand at least 2.5 kN, and the structure must carry the full load on the top fixing (up to 845 kg). The system has to be supported at the top and at least every 20 metres, up to a maximum run of 40 metres.
Conveying & Hoisting Solutions makes its own rubbish chutes in Sydney. The figures below come from our Rubbish Chutes Operating & Assembly Instructions (Form 4100), our operating manual for the chutes we hire. This guide covers the mounting itself. For planning the drop zone, daily checks and clearing blockages, see our rubbish chute installation and safety checklist.
Key takeaways
- Every anchorage must withstand at least 2.5 kN, and the structure must carry the full load on the top fixing (up to 845 kg). Support the chute at the top and at intervals of no more than 20 m, to a maximum of 40 m.
- A scaffold bracket or counterweighted frame can carry up to 40 sections. A parapet or window clamp can carry up to 20.
- The parapet clamp needs a structurally sound wall at least double brick thick. Glass, metal and timber balustrades don’t qualify.
- Never pull the bottom of the chute more than 2.4 m off vertical. At 40 m, that raises the load on the top fixing by almost half, from 576 kg to 845 kg. On a 10 m run it more than triples it.
- On a counterweighted frame, fit every counterweight before the first chute section goes on.
Which mounting method suits your site?
Choose the mounting from the structure you have, not the chute you want. Our chutes are designed for vertical use and hang from the top: from a centre bracket on scaffold or a parapet clamp, or from the chute support lugs on a counterweighted frame.
| Scaffold bracket | Window or parapet clamp | Counterweighted frame | |
|---|---|---|---|
| Maximum chute sections | 40 | 20 | 40 |
| What it fixes to | Scaffold that is tied to the building | A solid masonry wall, window sill or balcony wall | A flat roof or slab, with no fixings into the structure |
| Structure must withstand | 2.5 kN at the attachment point | 2.5 kN outward force; wall at least double brick thickness | At least 1,000 kg of total load |
| Best for | Sites that already have scaffold up | Renovations and strata jobs without scaffold | Flat roofs where you can’t clamp or drill |
If scaffold is already up, it’s usually the simplest anchor. If it isn’t, the parapet clamp avoids putting scaffold up at all, as long as the wall is heavy enough. The counterweighted frame suits flat roofs and suspended slabs where there’s no wall to clamp and no scaffold to fix to.
What does the structure have to hold?
More than most people expect. The manual requires every individual anchorage to support at least 2.5 kN (about 255 kg). But the structure the bracket is fixed to has to carry the total load on the top fixing, shown below. The top fixing carries the weight of every section below it. Each chute section weighs 13 kg and each load hopper 9 kg, and the load rises sharply if the bottom of the chute is pulled sideways towards a bin.
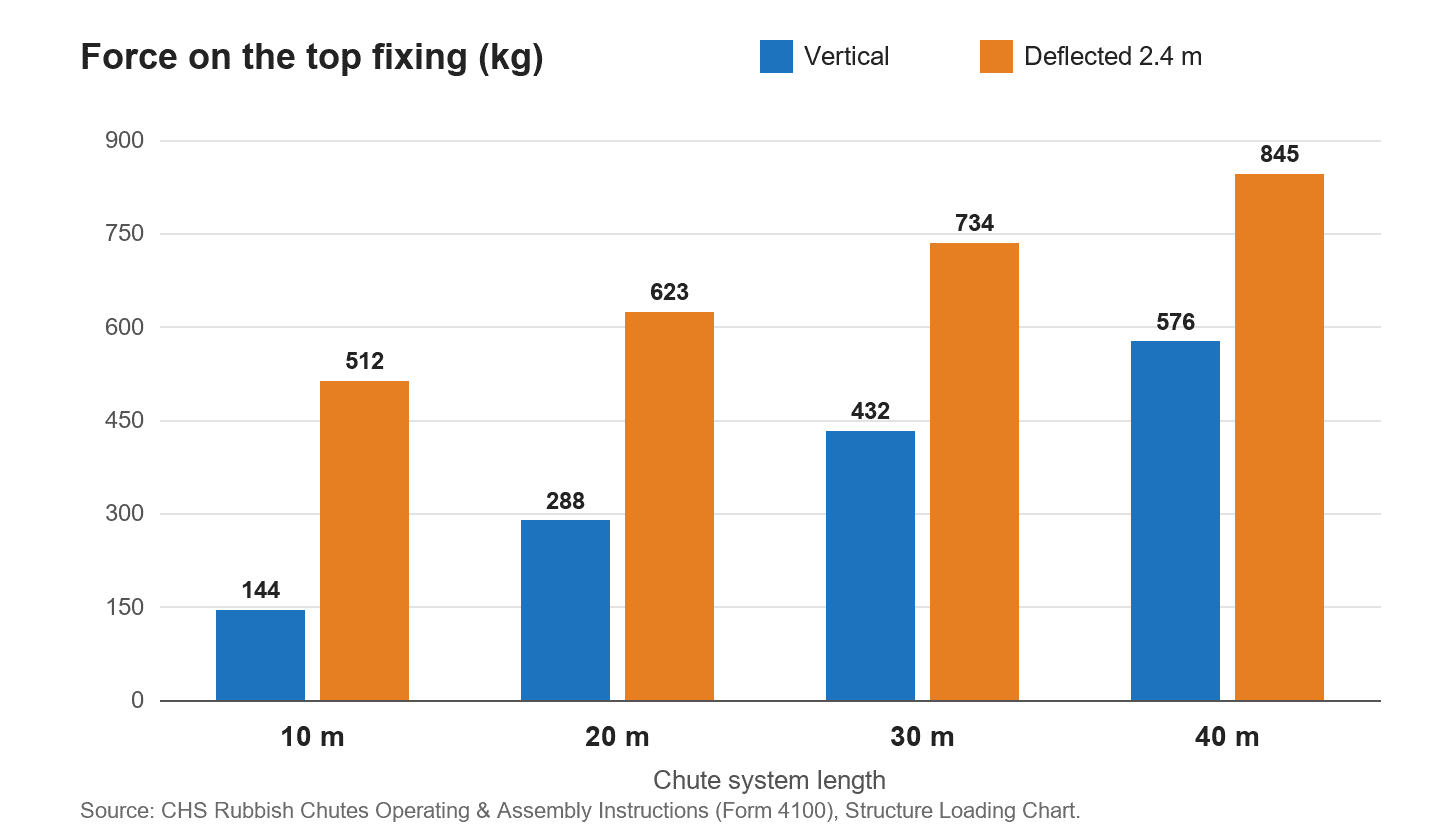
Force on the top fixing by system length. Source: CHS Rubbish Chutes Operating & Assembly Instructions, Form 4100, Structure Loading Chart.
| System length | Force with vertical system | Force with system deflected 2.4 m |
|---|---|---|
| 10 m | 144 kg | 512 kg |
| 20 m | 288 kg | 623 kg |
| 30 m | 432 kg | 734 kg |
| 40 m | 576 kg | 845 kg |
On a short run, deflection matters most. A 10 m chute pulled 2.4 m out puts more than three times the load on the fixing (512 kg against 144 kg). The manual caps deflection at 2.4 m from the vertical axis, and warns that pulling the chute out further during a bin change can dislodge the top section from its mounts. Position the bin under the chute, not the chute over the bin. When you have the wall, scaffold or slab checked, give the checker the figure from this table for your run length. Don’t just quote 2.5 kN.
How do I mount a rubbish chute on scaffold?
A scaffold bracket can carry up to 40 sections, provided the scaffold itself is up to it. Before fitting anything:
- Check the scaffold can withstand 2.5 kN at the attachment point. Your scaffolder should confirm this.
- Check the scaffold is tied to the structure above and below the attachment point.
- Check it’s anchored at each staging within 4 metres of the attachment point.
Then fit the bracket:
- Fit two horizontal braces across the scaffold at the mounting level.
- Attach the centre bracket in four places with scaffold clips.
- Brace the scaffold with two diagonal braces.
The braces are changes to the scaffold, so have your scaffolder fit or sign off on them. If the scaffold has been altered since its last inspection, have it checked before you hang a chute from it.
How do I mount a rubbish chute on a parapet, window or balcony wall?
Use the window or parapet clamp. It grips the wall from both sides and carries up to 20 sections. The wall is the limiting factor, so check it first:
- It must be at least double brick thickness.
- It must be structurally sound.
- It must be able to withstand 2.5 kN as an outward force.
Have a competent person check those three points before you clamp anything.
Balconies: the clamp works on a solid masonry balcony wall that meets the same test. It doesn’t work on glass, metal or timber balustrades, or on lightweight infill walls. If your balcony has one of those, mount on scaffold or use a counterweighted frame instead.
To fit the clamp:
- Cut a hardwood packing timber long enough to span the centre bracket and both clamps. It spreads the load on the inside face of the wall.
- Take the right-hand clamp assembly. Standing at the single-pad end, its centre-bracket mount tabs are on the left. Open the clamping screw as far as it goes.
- Pin the two halves together with the locking pin at roughly the thickness of the wall plus the packing timber. Fit the locking clevis pin.
- Place the clamp over the wall, fit the packing timber and tighten the clamping screw until just tight.
- Fit the centre bracket by placing its top and bottom spacer rails over the mount tabs on the clamp.
- Place the left-hand clamp over the wall, fit it to the centre bracket and tighten.
The centre bracket weighs 14 kg and each parapet bracket 12 kg, so plan for fall protection at the wall edge while you’re fitting them.
How do I mount a rubbish chute on a flat roof?
Use a counterweighted frame. It sits on the roof or slab, projects 0.5 m over the edge and is held down by counterweights, with no drilling or clamping. It carries up to 40 sections. The roof or slab must be able to take the frame, the counterweights, the chutes and any extra load from a blocked chute: at least 1,000 kg.
- Lay a left-hand and a right-hand support member on the roof, well back from the edge.
- Unfold the guard rail assembly.
- Fix it to the support members with M12 × 100 mm bolts, washers and nuts, or the pins provided.
- Slide the assembly into position so the guard rail sits at the edge.
- Fit the counterweights, half on each post.
- Only then mount the chute sections.
Step 5 must be finished before step 6. A frame with chutes but not all its weights can tip.
| Chute sections (with one load hopper) | Counterweights required |
|---|---|
| 5 | 6 |
| 10 | 10 |
| 15 | 15 |
| 20 | 20 |
The table is CHS’s current requirement. It only applies with the frame in its standard position (0.5 m outboard, 2.3 m inboard) and one load hopper. For extra hoppers or inlets, the manual gives the formula: counterweight mass = chute mass × 0.5 × 6 ÷ 2.3. That includes a safety factor of 6. Each counterweight weighs 18 kg. Never remove weights while the chute is in use.
How do the chute sections go together?
The sections hang, rather than being bolted together:
- Seat the top section in the centre bracket (or the chute support lugs on a counterweighted frame). The chain bracket lugs must sit firmly in the bracket’s mounting lugs. Gravity holds it in place.
- Hook the chains from the top section over the chain bracket of the next section. Leave three links free.
- Keep adding sections until you reach the length you need.
- Fit the load hopper securely into the top section.
For multi-level loading, fit a centre bracket at each loading level. Start at the lowest level and fit a load hopper. Hang the next string of sections from the centre bracket on the level above, and fit its bottom section into the hopper below. Join the strings through the hopper with extension chains, and keep working upward.
On taller runs, we can supply a hand winch that fits to the centre bracket. It lets you join all the sections on the ground and lift the whole string into place, instead of hanging sections one by one at height.
What can’t you do with a rubbish chute?
The manual’s prohibitions apply to every mounting method:
- No people or animals in the chute. It’s only for guiding falling material.
- No toxic or hazardous material, including asbestos. The hirer must tell us before a chute that has carried hazardous material is removed or returned.
- Nothing larger than the chute’s internal diameter, or longer than one section.
- No use in winds above 70 km/h.
- No modifications to the chute, brackets or safety devices.
- Barricade the bottom and post warning signs, so nobody works beneath the chute.
No licence is needed to operate a rubbish chute. The person managing the workplace must make sure the operator is at least 18 and competent to use it.
Should you mount it yourself or have it installed?
Either works. Crews who have fitted chutes before often collect from our Condell Park yard and do it themselves. Sections stack 16 to a pallet and fit in a ute or trailer. If the site has an awkward wall, a flat roof or a tall run, we can deliver, mount and remove the chute for you, and our vehicles carry lifting devices, so we don’t tie up your crane.
See runs, brackets and optional extras such as flat-roof and pitched-roof brackets on our rubbish chute hire page. For help choosing a chute, read lightweight vs heavy-duty rubbish chutes or skip bin vs rubbish chute. Or call (02) 9707 2797 and we’ll check your wall, scaffold or roof with you.
Specifications in this guide are from CHS Rubbish Chutes Operating & Assembly Instructions (Form 4100), except where noted as CHS’s current requirement, and apply to CHS rubbish chutes only. Other manufacturers’ systems will differ. Your site’s own risk assessment still applies.