
Sydney building sites have a habit of being tight, steep, and busy all at once. Terraces with narrow side paths. Inner-city laneways where deliveries are a puzzle. Sloping driveways in hilly suburbs. Backyard projects where the “laydown area” is basically a strip of pavers next to the bins.
When access is tight, the default solution becomes “just carry it”. That’s when manual handling risk ramps up quickly: more trips, more awkward postures, more twisting and reaching, more rushing, more fatigue. Over a full day (or a full week), those small strains add up to soreness, near-misses, and sometimes serious injuries that sideline people and slow the job.
The good news is you can usually reduce manual handling risk significantly without complicated systems. You just need a simple material-flow plan that reduces:
• how many times each item is touched
• how far it’s carried
• how often people twist, reach, or handle loads at awkward heights
• how much “decision-making under pressure” happens mid-task
This guide is built for tight-access Sydney jobs and focuses on practical setups you can apply to renovations, small builds, landscaping works, and demolition clean-ups.
What “manual handling” looks like on tight-access Sydney sites
Manual handling includes lifting, carrying, pushing, pulling, holding, or restraining. On tight sites, it often looks like:
• Bucketing spoil up steps because a wheelbarrow won’t fit
• Carrying plasterboard through a hallway while avoiding door jambs
• Re-handling bricks because the drop zone changed mid-job
• Dragging materials over uneven ground because the route isn’t cleared
• Twisting with a load because there isn’t space to turn safely
• Tipping into a skip at shoulder height because the approach is blocked
The pattern is consistent: tight access increases repetition and awkward movement. And the moment people get tired, technique slips and risk spikes.
Quick answer
If you only do one thing: plan material flow so every load is touched fewer times and carried a shorter distance. Good staging, a clear route, and the right mechanical aid for the bottleneck (often stairs, incline, distance, or discharge height) will usually deliver the biggest improvement.
The tight-access material-flow method
A tight-access site doesn’t forgive improvisation. The most effective setups follow a simple sequence:
- Decide where materials need to end up (not just where they arrive)
- Create a staging zone that prevents double-handling
- Clear and control the route so people aren’t “inventing” paths
- Match a mechanical aid to the hardest part of the journey
- Set simple site rules so everyone uses the system consistently
Think of it as building a “materials highway” before the first load shows up.
Q&A: What is the double-handling problem?
Double-handling happens when you touch the same material multiple times because it was dropped in the wrong place, the route wasn’t ready, or the next step wasn’t planned. Each extra touch adds extra lifts, carries, twists, and decisions. On tight-access sites, double-handling can easily become triple-handling—and fatigue climbs fast.
Step 1: Plan from the end point, not the delivery point
It’s tempting to plan around where the truck can stop. But the truck is only the beginning. The end point is what matters: where the material will be used or stored safely without blocking work.
Before unloading, ask:
• Where will it be used (room/level/zone)?
• Where can it be placed so it won’t need to be moved again?
• What’s the safest and simplest path to get it there?
• What will change later in the day that might block that path?
On many tight-access jobs, you’ll get better results by splitting deliveries into smaller drops closer to the workface, instead of one big pile at the front that everyone has to sort and carry later.
Sydney-specific tip: terraces and narrow side access
If the side path is the choke point, don’t stack everything out front “for later”. Create a small mid-point staging area (even if it’s just a cleared corner) so loads can be broken down and transferred in a controlled way, rather than being carried long distances in one go.
Step 2: Build a staging zone that prevents chaos
A staging zone isn’t just “where stuff lands”. It’s a controlled area that keeps materials stable, accessible, and out of pedestrian routes.
A good staging zone does four things:
• Keeps heavy items at waist-friendly heights where possible
• Prevents stacks that force bending, reaching, or twisting
• Separates incoming materials from outgoing waste
• Protects walkways so people don’t detour while carrying
Even on a tiny site, you can improve staging by defining boundaries: tape, cones, barriers, or a simple “this side in / this side out” rule.
The 90-second staging checklist
Before unloading, confirm:
• Ground is stable and level enough for safe stacking
• There’s a clear “in” and “out” path
• Heavy items are positioned to minimise re-handling
• Nothing blocks doors, stairs, or emergency egress
• You’ve allowed space to turn with a load (or planned a handoff point)
Q&A: Where should you stage materials on a tight-access site?
Stage as close as practical to the point of use without blocking movement. If you can’t stage near the end point, set a mid-point handoff zone. The goal is fewer long carries and fewer awkward turns—not perfect convenience for the delivery truck.
Step 3: Clear the route like you’re setting up a corridor
Routes on tight sites should be treated as “no surprises” corridors. Every obstacle becomes an awkward lift. Every detour adds distance and increases fatigue.
Clear and control:
• Trip hazards (rubble, cords, offcuts)
• Pinch points (gates, doorways, narrow turns)
• Surface changes (steps, ramps, wet grass, loose gravel)
• Visibility (blind corners, poor lighting)
• Conflicting traffic (people crossing the route)
If you’re moving repetitive loads (spoil, bricks, sheeting, tiles), a few minutes spent making the route predictable can save hours and reduce strain.
Sydney reality check: wet weather on slopes
After rain, side paths and driveways can become slippery. A route that’s “fine in the dry” can turn into a high-force pushing job in the wet. If the task depends on pushing/pulling equipment, plan traction and slope early.
Step 4: Use the hierarchy of controls, not just “lift better”
Manual handling doesn’t get solved with a pep talk. The safer approach is to control risk in a structured way—starting with higher-level controls:
• Eliminate: remove the manual task by changing the method
• Substitute: lighter materials, smaller loads, different packaging
• Engineering controls: mechanical aids, ramps, platforms, conveyors
• Administrative controls: sequencing, job rotation, supervision, training
• PPE: last line of defence, not a fix for force and awkward posture
For NSW-specific guidance on identifying and managing hazardous manual tasks, SafeWork NSW provides a practical overview here: SafeWork NSW hazardous manual tasks guidance
Q&A: What’s the most effective control on tight-access sites?
Usually, an engineering control that reduces repetition and awkward movement, because tight access often turns “one lift” into “fifty carries”. If you can change the method so material travels in a controlled path, you can reduce force, posture strain, and fatigue all at once.
Step 5: Match a mechanical aid to the bottleneck
Mechanical aids work best when they solve the hardest part of the move, not the easiest. On tight-access sites, bottlenecks are commonly:
• Stairs and steps
• Height changes (up to a skip, up to a scaffold deck, up a level)
• Long distances along narrow paths
• Access that’s too tight for wheelbarrows and trolleys
• Bulk materials that are repetitive and heavy
Common options include:
• Dollies/trolleys: great on flat, wide, predictable routes
• Wheelbarrows: useful with wider access and stable surfaces
• Material lifts/hoists: effective for vertical changes (requires safe setup and separation)
• Chutes: controlled downward movement (consider dust/noise and stability)
• Conveyors: continuous movement through tight access and repetitive loads, when set up correctly
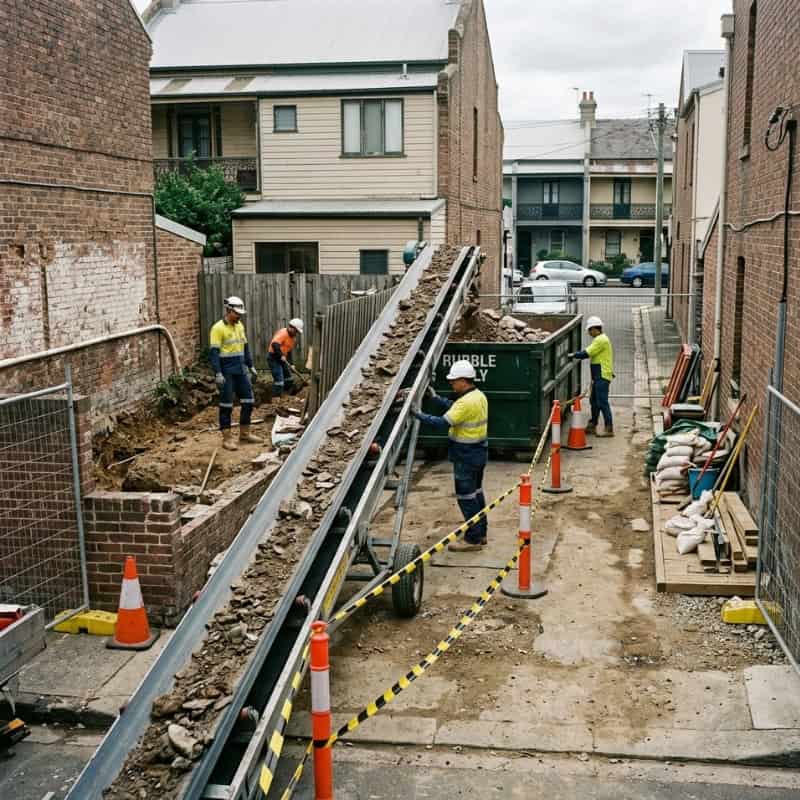
If your bottleneck is a narrow run, incline, or repeated spoil removal, a portable conveyor setup can transform the task from repeated carrying into controlled loading and monitoring—often reducing fatigue and re-handling.
When a conveyor helps most on tight-access Sydney sites
On tight-access jobs, the highest-risk manual handling typically comes from repeated carrying and awkward tipping—spoil, rubble, bricks, blocks, aggregate, and demolition waste. A conveyor can reduce those risks by turning dozens (or hundreds) of carries into a controlled, continuous movement path.
A conveyor is often worth considering when:
• Carry distance is long and repetitive
• Access is narrow, making barrows awkward or unsafe
• There’s an incline where pushing force spikes
• Materials need to move between levels or to a skip/stockpile
• The same material is being handled multiple times due to poor drop zones
From a risk-control perspective, this sits squarely in engineering controls: you’re redesigning the method to reduce force, awkward posture, and repetition. For practical scenario fit, start with a clear definition of your bottleneck and then build the flow around it: reduce manual handling risk.
Q&A: When is a conveyor better than “just carrying it”?
If the job involves repetitive loads through tight access, any method that shortens carries and stabilises movement will reduce strain. A conveyor is often the better option when you can create a safe feed point and a safe discharge point—so the task becomes controlled loading and supervision, not lifting and walking.
Conveyor setup checks that support safer material flow
Before running repetitive loads:
• Confirm the route is clear and stable (no soft ground collapse points, no trip hazards)
• Define safe feed and discharge zones (avoid crowding around pinch points)
• Separate pedestrians from the movement path (exclusion zone or clear physical separation)
• Keep loads consistent and avoid overfeeding
• Use a spotter where visibility is limited (laneways, tight corners)
• Maintain housekeeping around the conveyor so slips and trips don’t creep back in
If you’re deciding what type of conveyor setup suits a tight-access Sydney build—distance, incline, material type, discharge point—use a structured approach rather than guessing. A practical starting point is aligning site constraints to equipment capability: choosing the right conveyor for the Sydney construction site.
Tight-access scenarios and smarter material-flow setups
Below are common Sydney scenarios and the changes that usually make the biggest difference.
Scenario 1: Spoil removal from a backyard dig with narrow side access
What usually happens:
• Buckets and awkward carries
• Stops and starts due to congestion
• Higher-force movement up steps or on slopes
Better material flow:
• Put a small staging zone close to the excavation
• Keep the route consistent and clear (no detours around stored materials)
• Create a fixed discharge point so nobody is “finding a spot” each trip
• Use an engineering control when the task is repetitive and high-volume (especially when distance and incline are involved)
Key idea: reduce “carry kilometres”. If one person does 80 trips a day, even small improvements compound fast.
Scenario 2: Carrying plasterboard, flooring, or tiles through hallways and doorways
What usually happens:
• Awkward grips and twisting to avoid frames
• Repeated carries because staging is too far from the install zone
• Fatigue increases, quality drops, damage risk rises
Better material flow:
• Stage closer to the install zone (even in smaller batches)
• Protect corners and pinch points so people don’t contort to “save the wall”
• Plan sequencing so delivery/staging matches install order
• Use team lifts for awkward items, but reduce the total number of carries first
Key idea: if materials are carried past the same doorway multiple times, the layout is creating strain by default.
Scenario 3: Brick, block, and aggregate movement on small sites
What usually happens:
• Large drop at the front
• Long carries
• Constant bending to pick from low stacks
Better material flow:
• Split drops into two or three micro-staging zones closer to use
• Keep heavier items at a reasonable pick-up height where possible
• Create a predictable movement corridor so people aren’t weaving through the site
• Assign one person to keep staging tidy so others aren’t “sorting” while carrying
Key idea: organisation is a manual handling control. Messy staging forces awkward movement.
Scenario 4: Demo waste runs where the skip is in a tricky spot
What usually happens:
• Lifting and twisting to tip into the skip
• Poor housekeeping around the skip
• Conflicting traffic (people cutting through)
Better material flow:
• Define a waste route with a “no cross” rule during peak movement
• Reduce lift height where possible using a better discharge method
• Break down bulky waste at the source to prevent awkward carries
• Keep the skip area clear so people aren’t stepping over debris to dump
Key idea: a clean, controlled discharge zone often removes the most awkward part of the task.
The tight-access pre-start: 7 checks that reduce strain quickly
Before high-volume movement starts, run these checks:
• Route: Is there a clear corridor with no trip hazards?
• Staging: Do we have a drop zone that prevents double-handling?
• Pinch points: Doorways, steps, tight turns—do we need a handoff point or spotter?
• Surface: Wet, sloped, loose—will pushing/pulling force spike today?
• Timing: Are we moving materials during other high-traffic tasks?
• Communication: Who owns the method and can stop the task if it’s not working?
• Fatigue: Are we rotating tasks or breaking work into manageable batches?
Q&A: What’s the fastest way to reduce manual handling risk today?
Pick the biggest pain point—usually stairs, distance, or re-handling—then change the method so that point becomes easier. Clear the route, reset staging, and introduce the simplest engineering control that reduces repeated carrying. Small changes add up quickly on tight sites.
Rules that keep the system working (so it doesn’t fall apart)
Tight-access setups fail when people stop using them. Keep rules simple and visible:
• One route for materials (don’t let it become storage)
• One staging zone “owner” (someone maintains order)
• One method for repetitive loads (no “just this once” ad-hoc carries)
• Stop-and-fix if hazards appear (route degrades → pause and reset)
Consistency is the hidden productivity driver. Once a crew trusts the system, they move faster with less strain—because the job stops feeling like a daily obstacle course.
When to escalate: signs you need a higher-control solution
If you see these signs, it’s time to rethink the method rather than “push through”:
• People are lifting and twisting repeatedly to clear obstacles
• Loads are being handled more than twice (double-handling becomes normal)
• Carry distances grow as the site fills up
• Speed is being used to compensate for a poor layout
• Fatigue is obvious by mid-shift (slower movement, more near-misses)
• The route is exposed to conflicting traffic you can’t control
Escalation doesn’t always mean bigger equipment. Sometimes it means:
• changing delivery timing
• breaking loads into smaller drops
• relocating the waste point
• redefining staging so the next step is always obvious
But when repetitive carrying is the core problem—especially through tight access—an engineering control that changes the movement method can be the most effective step.
FAQ
What counts as a hazardous manual task in NSW?
Hazardous manual tasks typically involve forceful exertion, awkward postures, sustained positions, repetitive movement, vibration, or handling loads that are unstable or hard to grip. Risk increases when these factors combine—common on tight-access sites with stairs, narrow turns, and repeated carrying.
How do you reduce manual handling on a small site with no laydown area?
Use micro-staging: smaller drops closer to the point of use, plus a mid-point handoff zone. Keep one clear route, and avoid re-handling by making sure materials land where they’ll be used. If the task is repetitive, add an engineering control targeted at the bottleneck (distance, incline, or discharge height).
Is team lifting enough to manage manual handling risk?
Lifting as a team can help with awkward or bulky items, but it still doesn’t remove the risk if you’re moving through a cluttered route, handling the load repeatedly, or working in awkward postures.It’s usually more effective to redesign flow first (staging and route control), then use team lifting as needed.
What’s the biggest mistake on tight-access Sydney renovations?
Letting materials “land wherever” and assuming it will sort itself out later. That nearly always creates double-handling, longer carries, and rushed movement—exactly the conditions that increase strain and incidents.
How do you keep a material-flow plan working when the site changes daily?
Use simple rules: keep one materials corridor clear, assign staging ownership, and run a quick pre-start check before high-volume movement. Daily resets prevent clutter from turning the route into detours and awkward carries.
When does it make sense to consider a conveyor approach?
When the task involves repetitive movement through tight access, especially spoil, rubble, bricks, or aggregate; when there’s an incline; or when the discharge point (skip/stockpile) creates awkward tipping. The key is having a safe feed zone and a controlled discharge zone so the task becomes predictable and less physically demanding.